A seven-man lineout, drawn to the marks
Rugby · Set piece · 15 of your players
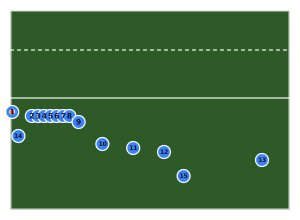
Every part of a lineout is governed by a line, and a whiteboard has none of them. Here the seven forwards sit between the 5 m and the 15 m because that is where the laws put them.
Opens on a rugby pitch with the shape already drawn. Free, no signup.
Seven bodies between two lines
The line forms about 26 m out from the try line — just outside your own 22 — and runs from roughly 5.5 m to 15 m in from the touchline, with about 1.5 m between each pair of feet. Front jumper and front lifter, middle jumper and middle lifter, back lifter and back jumper, and the tail of the lineout at the far end. The hooker throws from the touchline itself. The scrum-half stands just outside the 15 m line, a metre or so behind the tail, which is the detail most diagrams get wrong.
Behind that, the backs are stacked rather than flat: the fly-half about 7 m back and 6 m outside the 15, the two centres stepping out from there, the right wing wide, the blindside wing tucked in near the touchline and the fullback deep behind the centres. The gap between the 15 m line and the fly-half is the space the whole move is played into, and on a whiteboard with no 15 m line it is invisible.
The lineout this suits
Seven in the line is the safe, orthodox choice: it gives you three lifting pods, a driving option, and enough forwards left over that the tail can peel or the ball can go off the top. Take it when you are inside your own half and want possession without a gamble.
Shorten the line if you want the space — a five-man lineout drags two more defenders out and hands your backs the same pitch with fewer bodies in it. Keep seven when your throw is under pressure, when the wind is against you, or when the plan is to maul.
What to fix first at training
- Mark the receiver, not the jumper. Put the ball where the catch happens and draw the transfer to the scrum-half, so the two-second handover gets rehearsed like the rest.
- The fly-half's depth is a number. Move them a metre closer to the line and animate it — that is how a backline move ends up being played standing still.
- Show the peel. Drag the tail forward around the front and let it play, and the argument about who blocks whom answers itself.
Open the template in the designer, set the line the length your hooker trusts, then draw the throw, the catch and the first pass as one move.
Also known as
- lineout
- set piece
- jumper
- throw in
Shapes to look at next
Kick-off receive
Rugby · Set piece · 15 players
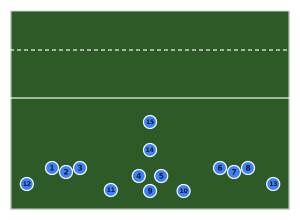
Receiving the restart: the forwards in two pods of three with a pair in the middle, all standing at least 10 m back from halfway where the ball has to land, the halves behind them and the outside centre and fullback covering the deep kick.
Read the setup
Attacking backline from a scrum
Rugby · Attack · 15 players
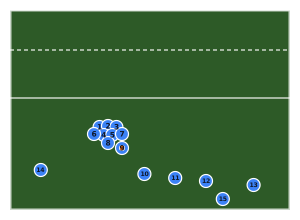
A full fifteen: eight bound into the scrum, the scrum-half at the base, and the backline fanned out to the open side roughly 8 m apart with the fly-half 10 m off the gain line. The blindside winger and fullback cover behind.
Read the setup
Attacking pods (1-3-3-1)
Rugby · Attack · 15 players
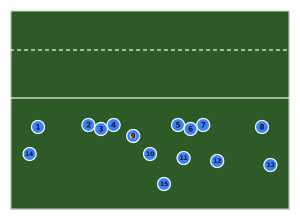
The forwards distributed across the field as one, three, three and one: a forward in each 15 m channel and two pods of three between them, with the halves, centres and back three in behind. Note the digits count players *across* the pitch, not lines of depth — 1-3-3-1 is a width map, which is exactly why it keeps a pod available on both sides of every ruck.
Read the setup
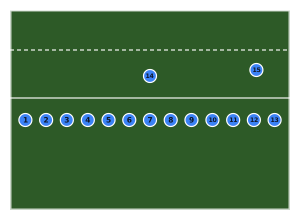
Defensive line (13 up, 2 back)
Rugby · Defence · 15 players
Thirteen in the front line at roughly 5 m spacing right across the pitch, with the fullback sweeping behind and the blindside winger holding the back field. The default defensive picture from a phase in the middle of the park.
Read the setup
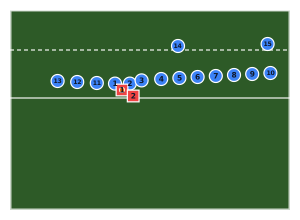
Ruck defence: pillar and post
Rugby · Defence · 17 players
Defending a ruck: two pillars either side of it, the post defender next out, then seven spread across the open side and three covering the blind, with the fullback and a winger sweeping. Gets the two jobs nobody volunteers for filled first.
Read the setup
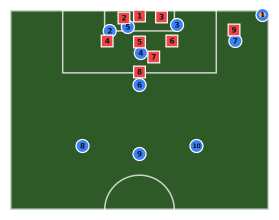
Attacking corner (right)
Soccer · Set piece · 19 players
A right-side corner: taker on the flag, runners at the near and far post, a target on the penalty spot, a short-corner option and three held back for rest defence. Ten outfield players — the keeper is in the other half, off screen. The nine defenders show a zonal set-up to attack against.
Read the setup
Put the Lineout (7-man) on a pitch
It opens with the shape already drawn. Move the players your team does differently, drag the runs, and send your squad a link that animates.
Open in PlaymakerPage updated · Rugby play designer · All templates