Play templates
44 formations, alignments and set plays across 6 sports — each one drawn to scale on a real pitch, each one a starting point you can drag runs onto.
Free forever, no signup, nothing to install.
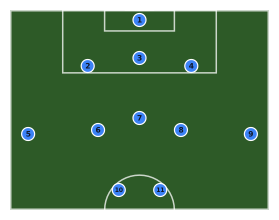
3-5-2
Formation · 11 players
Three centre backs, wing backs pushed high and wide onto the touchlines, a midfield three inside them and a front two. Overloads the middle and asks the wing backs to cover the whole flank.
Read the setup
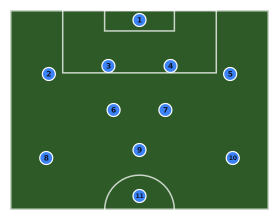
4-2-3-1
Formation · 11 players
Back four, a double pivot screening in front of them, three attacking midfielders and a lone striker. The modern default: solid through the middle with a number ten between the lines.
Read the setup
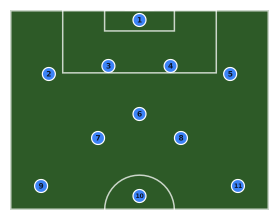
4-3-3
Formation · 11 players
Back four, a single pivot with two eights ahead of them, and a front three holding the width. The wingers sit on the touchlines so the full backs have the space to overlap.
Read the setup
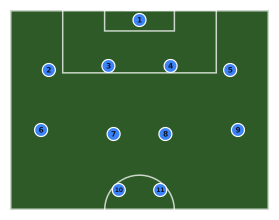
4-4-2
Formation · 11 players
The classic two banks of four with a front pair. Drawn as a mid block defending the goal at the top: back four on the edge of the penalty area, midfield four across the middle third, strikers up on the halfway line.
Read the setup
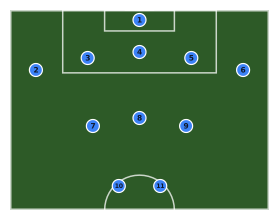
5-3-2 low block
Defence · 11 players
A back five dropped onto the edge of the six-yard box with a midfield three in front and two strikers held back for the counter. What you set up when you are protecting a lead.
Read the setup
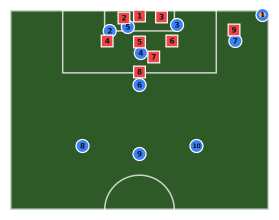
Attacking corner (right)
Set piece · 19 players
A right-side corner: taker on the flag, runners at the near and far post, a target on the penalty spot, a short-corner option and three held back for rest defence. Ten outfield players — the keeper is in the other half, off screen. The nine defenders show a zonal set-up to attack against.
Read the setup
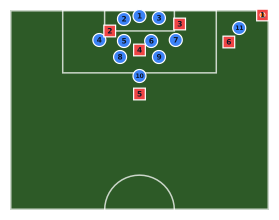
Defending a corner (zonal)
Set piece · 17 players
Zonal corner defence: keeper on his line, bodies on both posts, four across the six-yard line, two on the penalty spot, one on the edge of the box and one out to press the taker. All eleven of ours, against six attackers.
Read the setup
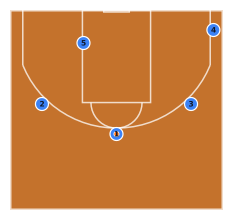
4-out 1-in
Attack · 5 players
Four players spaced around the arc with one post on the left block. Keeps a genuine inside threat while leaving three-quarters of the floor open for perimeter action.
Read the setup
5-out
Attack · 5 players
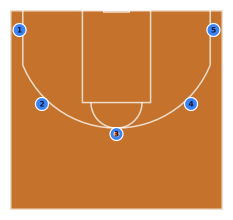
All five outside the three-point line — both corners, both wings and the top of the key — so the lane is completely empty to drive or cut into. The spacing motion offence most youth programmes start with.
Read the setup
High pick and roll
Attack · 5 players
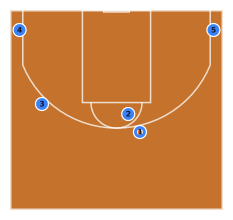
Ball handler above the arc on the right with the screener stepping up to meet him, both corners filled and the weak-side wing lifted. The three spacers keep help defenders a pass away from the roll.
Read the setup
Horns
Attack · 5 players
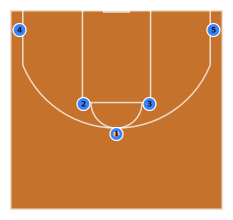
Two bigs at the elbows, two shooters in the corners, the ball at the top of the key. Every horns action — the double drag, the flare, the elbow entry — starts from exactly this picture.
Read the setup
1-2-2 zone
Defence · 5 players
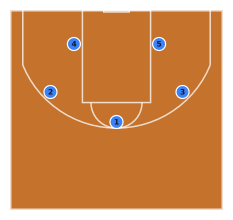
One up top, two on the wings and two low. Pressures the ball higher than a 2-3 and invites the pass into the middle, where the two low defenders are waiting.
Read the setup
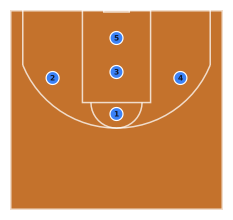
1-3-1 zone
Defence · 5 players
One at the point, three across the middle — two wings plus a defender in the heart of the lane — and one on the baseline. Traps hard in the corners and takes away the high post.
Read the setup
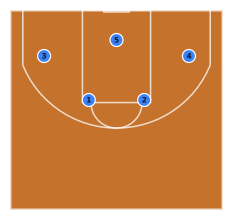
2-3 zone
Defence · 5 players
Two guards at the free-throw line extended over three across the baseline. Protects the paint and the boards, and asks the offence to beat it from outside.
Read the setup
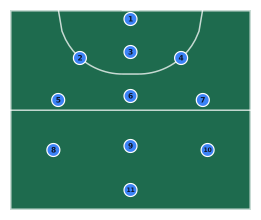
3-3-3-1
Formation · 11 players
The Dutch structure — three lines of three behind a single striker. Short passing distances in every direction, which is what makes it the shape most possession-based hockey is coached from.
Read the setup
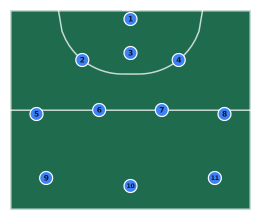
3-4-3
Formation · 11 players
Three at the back, four across midfield stretched to both sidelines and a front three. Attacking by default: the wide midfielders give you five in the front line whenever you have the ball.
Read the setup
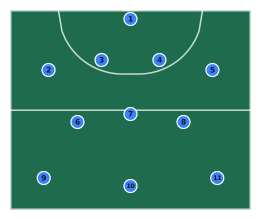
4-3-3
Formation · 11 players
Field hockey’s workhorse shape: a back four, three through the middle and a front three holding the width. Drawn defending the goal at the top, with the forwards up on the halfway line.
Read the setup
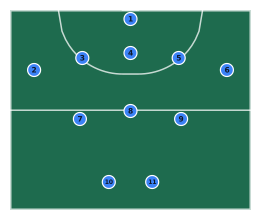
5-3-2
Formation · 11 players
Five across the back with three in midfield and two forwards. The extra defender covers the width of the pitch and lets the outside backs join the attack one at a time.
Read the setup
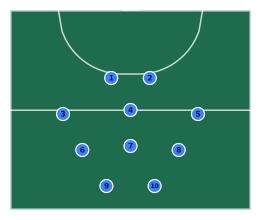
Full press (2-3-3-2)
Defence · 10 players
Pressing high in the opposition half: two on the circle edge forcing the outlet, three behind them, three across midfield and two holding. Ten outfield players — a full press leaves the keeper in your own half, off screen.
Read the setup
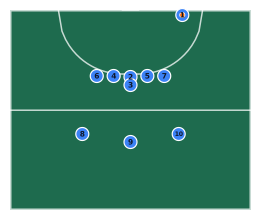
Penalty corner attack
Set piece · 10 players
The injector on the backline 10 m from the post, with the trapper, striker, both slips and both post runners lined up on the edge of the shooting circle — every attacker but the injector has to start outside the circle, and these do. Ten outfield players; the keeper is back in your own half, off screen.
Read the setup
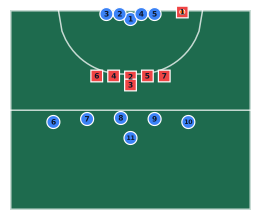
Penalty corner defence
Set piece · 18 players
The legal defensive set: goalkeeper plus four defenders on the goal line ready to break, and the remaining six beyond the 23 m line where the rules require them. Shown against a full attacking penalty-corner set-up.
Read the setup
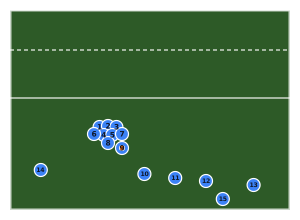
Attacking backline from a scrum
Attack · 15 players
A full fifteen: eight bound into the scrum, the scrum-half at the base, and the backline fanned out to the open side roughly 8 m apart with the fly-half 10 m off the gain line. The blindside winger and fullback cover behind.
Read the setup
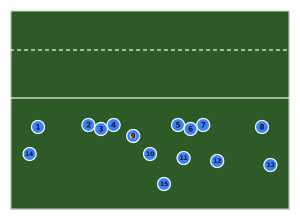
Attacking pods (1-3-3-1)
Attack · 15 players
The forwards distributed across the field as one, three, three and one: a forward in each 15 m channel and two pods of three between them, with the halves, centres and back three in behind. Note the digits count players *across* the pitch, not lines of depth — 1-3-3-1 is a width map, which is exactly why it keeps a pod available on both sides of every ruck.
Read the setup
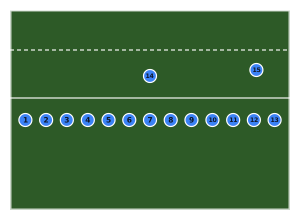
Defensive line (13 up, 2 back)
Defence · 15 players
Thirteen in the front line at roughly 5 m spacing right across the pitch, with the fullback sweeping behind and the blindside winger holding the back field. The default defensive picture from a phase in the middle of the park.
Read the setup
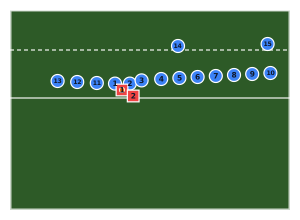
Ruck defence: pillar and post
Defence · 17 players
Defending a ruck: two pillars either side of it, the post defender next out, then seven spread across the open side and three covering the blind, with the fullback and a winger sweeping. Gets the two jobs nobody volunteers for filled first.
Read the setup
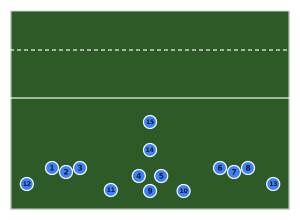
Kick-off receive
Set piece · 15 players
Receiving the restart: the forwards in two pods of three with a pair in the middle, all standing at least 10 m back from halfway where the ball has to land, the halves behind them and the outside centre and fullback covering the deep kick.
Read the setup
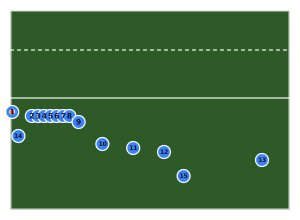
Lineout (7-man)
Set piece · 15 players
Seven forwards formed between the 5 m and 15 m lines with the hooker throwing from the touchline, the scrum-half receiving just outside the 15 m line and the backs stacked behind. Where the whole line stands is the bit coaches get wrong on a whiteboard, so it is drawn to the marks.
Read the setup
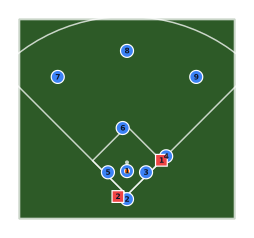
Bunt defence (corners in)
Defence · 11 players
Both corner infielders charge on contact, the pitcher breaks towards the plate, the second baseman covers first and the shortstop takes second. The outfield comes in behind it because nobody is left to back the infield up.
Read the setup
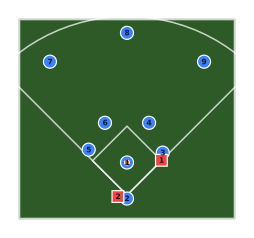
Double-play depth
Defence · 11 players
Runner on first, less than two out: the second baseman and shortstop move in to about 140 ft and shade towards the bag so either can take the feed and turn two. Trades range in the hole for a step less to the base.
Read the setup
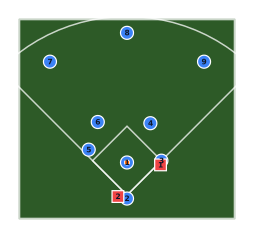
Holding the runner at first
Defence · 11 players
First baseman on the bag for the throw over, second baseman leaning towards the bag to take the steal, shortstop a step across. The hole on the right side is the price of holding the runner close.
Read the setup
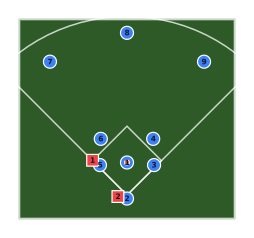
Infield in
Defence · 11 players
Runner on third in a one-run game: all four infielders move onto the grass to cut the run off at the plate. The ground ball that would have been an easy out is now a play at home.
Read the setup
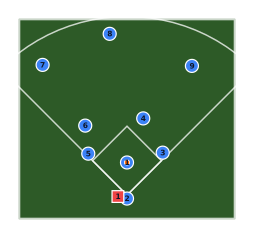
Infield shaded to the pull side
Defence · 10 players
A legal shade against a right-handed pull hitter: third base guards the line, the shortstop slides towards the hole and the second baseman moves towards the bag — but two infielders stay on each side of second, as the rules have required since 2023. The outfield rotates with them.
Read the setup
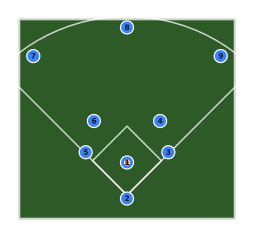
No-doubles defence
Defence · 9 players
Late innings, protecting a lead: the corners guard the lines and the outfielders play deep and towards the gaps. Concedes the single to take the extra-base hit away.
Read the setup
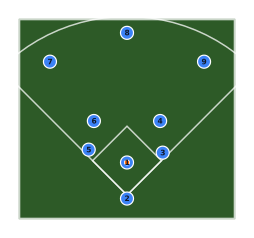
Standard fielding alignment
Defence · 9 players
The nine where they stand with nobody on and nothing to defend against: middle infielders about 150 ft out either side of second, corners in front of their bags, and the outfield at 285-300 ft. Everything else on this list is a change from here.
Read the setup
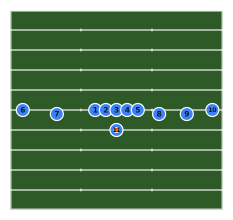
Five wide
Formation · 11 players
Empty backfield, five eligible receivers spread from sideline to sideline and nobody left to block but the five up front. Every defender is accounted for before the snap, which is the whole argument for it and the whole risk of it.
Read the setup
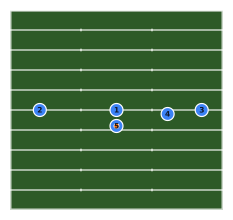
Flag 5v5 spread
Formation · 5 players
Five a side: a centre to snap it, a quarterback, and three receivers spread as wide as the field allows. With no blocking and no back, every play is a route combination and every defender is in coverage.
Read the setup
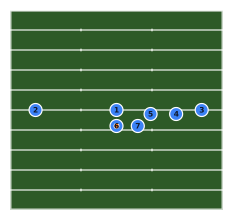
Flag 7v7 trips right
Formation · 7 players
Seven a side, no line to speak of: a centre, a quarterback, a back and four eligible receivers with three of them stacked right. Flag is played on a narrower field than this one, but a yard is a yard, so the six-yard gaps between the receivers are what transfers.
Read the setup
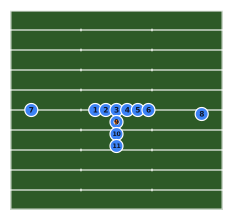
I formation
Formation · 11 players
The base two-back set: tight end and flanker to the strong side, split end isolated left, and the fullback and running back stacked directly behind the quarterback. Drawn on the 25 so a route tree has the full 25 yards to the goal line.
Read the setup
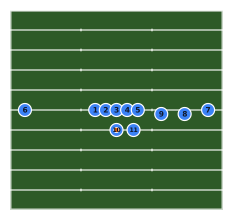
Shotgun trips right
Formation · 11 players
Three receivers stacked to the right with the back beside a shotgun quarterback, leaving the split end alone on the left. The formation that makes a defence declare where its extra defender is going before the snap.
Read the setup
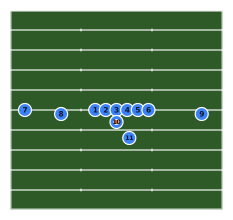
Singleback spread
Formation · 11 players
One back, one tight end and three receivers — the most common set in the sport, because it can run and throw from the same picture. Quarterback under centre, back offset behind him, slot receiver to the weak side.
Read the setup
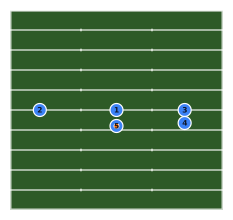
Flag 5v5 stack right
Attack · 5 players
Two receivers stacked one behind the other on the right, so a defender cannot line up over both of them. Whichever way the front man releases, the back man goes the other, and the coverage has to sort it out on the run.
Read the setup
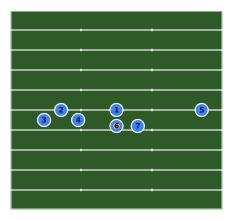
Flag 7v7 bunch left
Attack · 7 players
Three receivers bunched in a triangle to the left, which is how a seven-a-side team beats man coverage without a blocker in sight: the defenders have to run through each other to stay attached.
Read the setup
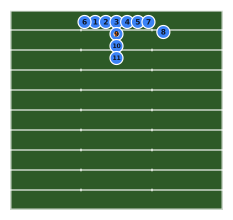
Goal line heavy
Attack · 11 players
Second and goal from the three: two tight ends, a wing, and three players stacked in the backfield. Nine blockers against a defence with nowhere left to retreat to — the one situation where the end zone is the whole diagram.
Read the setup
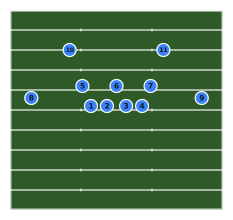
Cover two shell
Defence · 11 players
Four down, three linebackers and two safeties splitting the deep half of the field between them, with both corners squatting on the flat. The coverage that gives up the seam and takes away everything outside it.
Read the setup
Start from a shape, then make it yours
Every template opens on the pitch it was drawn for. Move the two or three players your team does differently, drag the runs, and send your squad a link that animates.
Open the designerLibrary updated